Saturday, April 6, 2013

Dynamically create html elements with jquery in a SharePoint Content Editor Web Part

One of the ways I like to create solutions with SharePoint is to utilize the Content Editor web part with some jquery to sort of commandeer the UI, because sometimes you just need to get some prototypes put together and the fastest way is to mock up and then create similar functionality.

In this example I have a document library that I have 9 pages in, I created the page names to coincide with the names of the dynamically generated buttons, divs, and iframes I am creating. My page names are
"Home", "Cost", "Schedule", "Performance", "Charts", "Reports", "Logistics", "Inventory"

Basically what I do is that I have2 empty divs on my page, and then as the page loads it creates all the buttons, divs, and iframes based off the list above that is used as an array.

What I really like about this solution is that I can reuse it over and over again since in order to get this script to work from a central location  I had to abstract out the order number to be used as a parameter which happens to be the site's title and is included in my url. Since all of our sub sites are created based off a template this works perfectly.


The script that my content editor points to looks like this


Now that we have that we can turn our attention to the javascript file that will loop through the array and create our buttons, divs, and iframes

// Define some initial variables
var buttonClicked = 'showHome';
var currentDiv = 'divHome';
var homeUrl="";
var siteName = "/dashboards/";
var siteLibrary = "/SitePages/";
var urlEnd = ".aspx?isdlg=1";
// This is an array of all the items names we want to use for our buttons
var pages = ["Home", "Cost", "Schedule", "Performance", "Charts", "Reports", "Logistics", "Inventory"];
// Since this script is centralized we need to look at the current Dashboard and get the task order number
var currentTaskOrderUrl = window.location.href;
var TaskOrderNumber = currentTaskOrderUrl.split('/')[4];
// onClick event for our dynamically created buttons
$(".switchIframe").live('click', function(e){
 // Lets make sure that nothing happens if the user clicks an already selected button
 if (e.target.id != buttonClicked)
 {
  
  // The user clicked a button for new content, we can target the div we want to show by 
  // doing a replace of the currently selected button's id, which has the same id name 
  // button id = showHome & div id = divHome
  targetDiv = (e.target.id).replace("show", "div");
  var $targetIframe = $($(this).data('target')), 
  src = $(this).data('src');
  
  if($targetIframe.attr('src') != src)
  {
   $targetIframe.attr('src', src);
  }

  hideDiv(currentDiv);
  showDiv(targetDiv);
  currentDiv = targetDiv;
  buttonClicked = e.target.id;
 }
    
});

function createLayout()
{
 var b;
 // Loop through the array of items we need to create
 for(b=0;b');
  // Source code to create all of our divs and iframes inside a div with an ID of contentdivs
  $("#contentdivs").append('
'+pages[b]+'
'); } } function showDiv(id) { var $sDiv = $('#' + id); $sDiv.show(800); } function hideDiv(id) { var $hDiv = $('#' + id); $hDiv.hide(200); } $(document).ready(function(){ // Build the UI elements, buttons, divs, iframes createLayout(); // Load up the source attribute of the home iframe $('#iframeHome').attr('src', homeUrl); // Show the div $('#divHome').show(600); });

Powershell add a document library to a set of sub sites recursively

So during one of my many experiments the other day I found I needed a document library on all of my orders sites that had a custom web part page in it. While there are several ways of doing this with Powershell I chose to loop through my sub sites and add the DashboardSitePages document library to each site from scratch. I also wanted to add a web part page to this library named Dashboard.aspx.

Hey for some reason my script pasting function is not rendering the xml line very well below so here is a link to the complete script file.

## DESCRIPTION
## ------------------------------------------------
## Script to loop through a set of Subsites and  
## adds a document library named SitePages  and a 
## web part page to the site named dashboard.aspx
 
## EXPLAINATION
## ------------------------------------------------
## This example illustrates how to loop through a  
## set of sub sites and add a document library and a 
## web part page named dashboard.aspx 

##
## BEGIN
## ------------------------------------------------
## Load up the snapin so Powershell can work with SharePoint
## if the snapin was already loaded don't alert the user
Add-PSSnapin microsoft.SharePoint.PowerShell -ErrorAction SilentlyContinue
## Clear any errors or output to the screen
CLS
## Set variables
## This variable will be the site where I want to start
$parentSite = "http://sp2010/dashboards"
$webSites = Get-SPWeb $parentSite

$layoutTemplate = 2
$documentLibraryDescription = "A Document Library to store the Dashboard Pages"
$pageTitle = "Dashboard"
$targetLibrary = "DashboardSitePages"

function CreateSitePagesDocLib
{
 $listTemplate = [Microsoft.SharePoint.SPListTemplateType]::DocumentLibrary
 $webSite.Lists.Add($targetLibrary, $documentLibraryDescription, $listTemplate)
 $docLib = $webSite.Lists[$targetLibrary]
 $docLib.OnQuickLaunch = $true
 $docLib.EnableVersioning = $true
 $docLib.Update()
 CreateDashboardPage
}

function CreateDashboardPage
{
 $list = $webSite.GetList("http://sp2010/dashboards/$webSiteName/SitePages/")
 $xml = "" + $list.ID + "NewWebPageNewWebPartPage" + $layoutTemplate + "true" + $pageTitle + ""
 
 $result = $webSite.ProcessBatchData($xml) 
}

foreach($webSite in $webSites.Webs)
{
 $webSiteName = $webSite.Name
 $webSiteDescription = $webSite.Description
 $sitePagesLib = $webSite.Lists[$targetLibrary]
 if($sitePagesLib)
 {
  CreateDashboardPage
 }
 else
 {
  CreateSitePagesDocLib
 }
}

Sunday, March 31, 2013

Custom SharePoint Site Title Bar using jquery


One of the new items we wanted to add to our dashboard front pages was a site name and description bar across the top of the pages for our dashboards. Each of our dashboard sites was created using a Powershell export of a site we configured exactly the way we wanted, making it our template site, and then importing the site with a new name.

This gives us 100s of sites with the same configuration, page layout, and webparts named the same, but content is specific to each site such as financial data and other reports.

The approach to solving this issue was to use a bit of css, jquery, and a content editor web part. The content editor web parts will allow you to either enter free text and decorate it any way you like, or you can create your layout and copy the script and paste it into notepad and then save the file to a document library at the root of your site that has read access for any of your visitors. We also keep a copy of jquery 1.8.3 in this same document library called scripts. The newest version of jQuery breaks some of our functionality, so be sure to use the earlier version.

One requirement in building this was it had to be easy to update, so by keeping our code for the content editor web part in a single text file stored at the root of our site and then configuring each web part to point to this file we can now update hundreds of web parts with a single bit of code.

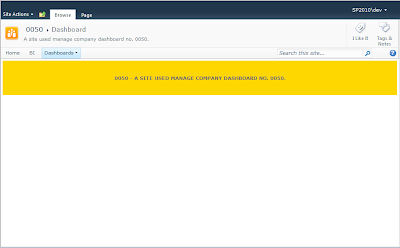
The end results were that I needed to have this yellow Title banner web part on each of my sites, the title banner is basically using jQuery to find some class tags on the page that contain the current site's title and description, two items already on the page, but not very easy to read.


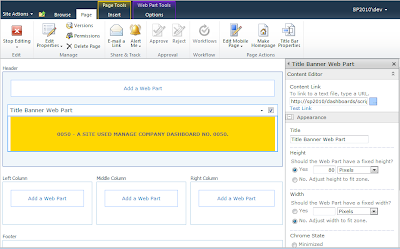
You can see when we view the web part properties that the values have been set by our script, note the Content Link field, it points to my root document library where the web part reads the script that all the web parts will read, if we need to make a change to the web part this is where it will be done.


Each of these sites in the drop down need this dynamic web part added to it's Dashboard.aspx web part page.


Another example of the web part on a different site


Now that all that is working we need a way to automatically inject this web part onto all of our sub sites at once, this is where Powershell will prove its self once more. My previous post of Add/Update a web part with Powershell should be all you need to sort out the automation part.

Saturday, March 30, 2013

Powershell Delete a webpart from a SharePoint webpart page loop

Today I find that when I create new things, often times I create too many things during my testing of say dynamically adding a webpart to a SharePoint webpart page. So I need to have a way to quickly loop through my hundereds of sites and delete the webpart.


## CONTACT INFO
## ------------------------------------------------
## CREATED   : 2013.03.30
## MODIFIED  :
## AUTHOR    : Jason Lasby 
## EMAIL     : digitalslavery@gmail.com 
##
## DESCRIPTION
## ------------------------------------------------
## Script to loop through a set of Subsites and  
## Delete a web part from a page stored in the SitePages 
## Document Library named Dashboard.aspx
## 
## EXPLAINATION
## ------------------------------------------------
## This example illustrates how to delete a webpart 
## from a set of sites that use the same page layout
## and configured with the same web parts, think about 
## a company dashboard site where each department may 
## report standard data like who is in who is out, 
## work related accidents, finance data, shipping
## information, etc... We can loop through our sites
## and add or remove web parts for all sites at once.
##
## BEGIN
## ------------------------------------------------
## Load up the snapin so Powershell can work with SharePoint
## if the snapin was already loaded don't alert the user
Add-PSSnapin microsoft.SharePoint.PowerShell -ErrorAction SilentlyContinue
## Clear any errors or output to the screen
CLS
## Set variables
## This variable will be the site where I want to start
$parentSite = "http://sp2010/dashboards"

function RemoveWebPart 
{
 foreach($wp in $wpm.WebParts | ?{$_.Title -like "* Banner *"})
 {
  if($wp)
  {
   $listOfWebParts = $wp.ID
   foreach($matchFound in $listOfWebParts)
   {
    $wpm.DeleteWebPart($wpm.WebParts[$matchFound])
    Write-Host "$matchFound was deleted for $webSite"
   }
  }
     
 }
}

Start-SPAssignment -Global
## Create a variable to hold the SharePoint site, invoke the connection
## to the site we defined in the $parentSite variable
$web = Get-SPWeb $parentSite
## Check to make sure that url exists
if($web)
{
 ## Loop through all the sub sites of the site url we got
 foreach($webSite in $web.Webs)
 {
  $webSiteName = $webSite.Name
  $pageUrl = "SitePages/dashboard.aspx"
  $page = $webSite.GetFile($pageUrl) 
  $wpm = $webSite.GetLimitedWebPartManager($page, [System.Web.UI.WebControls.WebParts.PersonalizationScope]::Shared)
  if($wpm)
  {
   RemoveWebPart 
  }
  else
  {
   Write-Host "Web part not found"
  }
   
 }
}
 else
 {
  ## Gracefully let the user know that the site they requested
  ## was not available or was not found.
  Write-Host "$webSite not found, check the url and try again."
 }

Stop-SPAssignment -Global


Powershell dynamically add a web part and set it's properties SharePoint

Having some fun today getting a bit further along with my Powershell scripts. Today I needed to dynamically add a SharePoint Document Library to each of my dashboard sites. In the newly created SitePages Document Library I needed to also have a Web Part Page with a Header Web Part Zone and the page needed to be named Dashboard.aspx.


## CONTACT INFO
## ------------------------------------------------
## CREATED   : 2013.03.30
## MODIFIED  :
## AUTHOR    : Jason Lasby 
## EMAIL     : digitalslavery@gmail.com 
##
## DESCRIPTION
## ------------------------------------------------
## Script to loop through a set of SharePoint Subsites and  create
## a new Document Library at each sub site named SitePages,&
## then add a page to this new SitePages Document Library
## named Dashboard.aspx
## 
## EXPLAINATION
## ------------------------------------------------
## This example illustrates how to dynamically loop
## through a set of sub sites and add a Document Library 
## to each sub site and populate it with a web part page.
##
## BEGIN
## ------------------------------------------------
## Load up the snapin so Powershell can work with SharePoint
## if the snapin was already loaded don't alert the user
Add-PSSnapin microsoft.SharePoint.PowerShell -ErrorAction SilentlyContinue
## Clear any errors or output to the screen
CLS
## Set variables
## This variable will be the site where I want to start
$parentSite = "http://sp2010/dashboards"

$webPartProperty_Title = "Title Banner Web Part"
$webPartProperty_ZoneName = "Header"
$webPartProperty_Height = "80"
$webPartProperty_Width = ""
$webPartProperty_Visible = $true
## All content editor web parts will point to this script
$webPartProperty_Link = "http://sp2010/dashboards/scripts/spservicesTest.txt"

Start-SPAssignment -Global
$site = Get-SPWeb $parentSite
$webSites = $site.Webs
foreach($webSite in $webSites)
{
    $order = $webSite.Name
    $page = $webSite.GetFile("/dashboards/$order/SitePages/Dashboard.aspx") 
    $webPartManager = $webSite.GetLimitedWebPartManager($page, [System.Web.UI.WebControls.WebParts.PersonalizationScope]::Shared)
 foreach($webPart in $webPartManager.WebParts)
 {
  $listOfAllWebParts = $webPart.Title
 }
 ## Check the page to see if the web part was already on it
 if($listOfAllWebParts -eq $webPartProperty_Title)
 {
  Write-Host "$webSite already had web part on it."
 }
 ## Create the web part and set some of it's properties
 else
 {
  $cewp = New-Object Microsoft.SharePoint.WebPartPages.ContentEditorWebPart
  $cewp.ContentLink = $webPartProperty_Link
     $cewp.Title = $webPartProperty_Title
     $cewp.Height = $webPartProperty_Height
     $cewp.Width = $webPartProperty_Width
  $cewp.Visible = $webPartProperty_Visible
  $cewp.ChromeType = "None"
     $cewp.HorizontalAlign = "Center" 
     ## The AddWebPart takes 3 arguments, first is the web part name, 
     ## then the zone id 
     ## and finally the order number where you want the web part to show in the zone
     $webPartManager.AddWebPart($cewp, $webPartProperty_ZoneName, 0)
     $webPartManager.SaveChanges($cewp)
     $webSite.Dispose()
  Write-Host "Webpart was created for Order $order"
 }
}

Stop-SPAssignment -Global

Monday, March 4, 2013

SharePoint dynamically load content into an iframe

For some weird reason I have had this fascination with trying to use the iFrame with a CEWP and some javascript to basically load in other content found within the site collection into a static page. I guess one of the things I really don't like about SharePoint is all the button clicking required to use it on a daily basis, also I have to often find a no code type solution, so this will be ideal for a quick prototype.

This time I finally succeeded in getting this to work pretty close to the way I wanted it to. This working examples uses a few things, I have a site that has several dashboard type sites under it. Each dashboard sub site will have a Pages Library and about 10 web part pages in it. These pages are standard web part pages and as such can be used for showing a set of related bits of data on my main page on as their own independent pages, reports, or other generalized groups of information.

My goal was to have the main page for each sub site have a either a HTML Form Web Part or a  Content Editor Web Part on it. The CEWP will point back to a centrally managed script file called dashboardIframe.txt that I stored in the root site in a document library called scripts and set domain users to have read permissions. To get things going I am going to use the HTML Form Web Part and edit the code right on the page.

The script has a set of buttons with pre-defined urls, that when clicked with run a bit of javascript that basically dynamically sets the src attribute of the iframe and forces it to reload, giving us the additional content we would like to display.

?isdlg=1 needs to be appended to each url to hide the ribbon just like when the modal dialog window opens.
My example below loads the main page from each one of my dashboard sub sites, there is only the description of the site and its name showing right now on each page.
Each button click loads a page from a  different SharePoint site into our iframe
This has potential to be pretty useful for when you have too much stuff on one page and you want to break it apart and centralize where you go to see it or a wide range of content from pretty much anywhere in  your portal. This works great for displaying views of libraries and lists too, plus you only load what your users want to see.

Monday, February 25, 2013

Compare dynamic arrays with Powershell and some SharePoint

Today was a day I got to work on a revision to a script that I thought was working but apparently was not tested as well as I thought, not uncommon with pretty much everything I have done thus far. :) This is pretty well commented. I am starting to make use of templates when working with scripts to keep them looking a bit easier to understand.


## DESCRIPTION
## ------------------------------------------------
## Script to loop through a set of Subsites and a 
## SharePoint List of items and then either
## create a new item or update it in your SharePoint List.
## 
## EXPLAINATION
## ------------------------------------------------
## This example illustrates how to compare 2 dynamically 
## created arrays, look for the difference between
## the two, then do something like update a SharePoint list, 
## this could also apply to updating a text file
## or csv/excel file
##
## BEGIN
## ------------------------------------------------
## Load up the snapin so Powershell can work with SharePoint
## if the snapin was already loaded don't alert the user
Add-PSSnapin microsoft.SharePoint.PowerShell -ErrorAction SilentlyContinue
## Clear any errors
CLS
## Set variables
## This variable will be the site where all the subsites 
## are that I want to get an array of
$parentSite = "http://sp2010/clients"
$rollupSite = "http://sp2010"
## Define the name of the SharePoint List we want to work with
$rollupListName = "Orders"
## Initialize and create empty arrays
$listOfSites = @()
$listOfItems = @()

function GetListOfSites
{
 ## Create a variable to hold the SharePoint site, invoke the connection
 ## to the site we defined in the $parentSite variable
 $web = Get-SPWeb $parentSite
 ## Check to make sure that url exists
 if($web -ne $true)
 {
  ## Loop through all the sub sites of the site url we got
  foreach($webSite in $web.Webs)
  {
   ## We have to use @() around the items we are going
   ## to add to the array. The += means we want to 
   ## keep adding items into our array named $listOfSites
   $listOfSites += @($webSite.Title)
  }
  ## Calling a function inside another function will allow you to make
  ## use of variables defined in functions that call it. Normally variable
  ## values are only accessible in the scope they were created. We need
  ## to pass off $listOfSites to the function GetLIstOfItems so it can process 
  ## the array
  GetListOfItems
 }
 else
 {
  ## Gracefully let the user know that the site they requested
  ## was not available or was not found.
  Write-Host "$web not found, check the url and try again."
 }
}

function GetListOfItems
{
 $listWeb = Get-SPWeb $rollupSite
 $listName = $listWeb.Lists[$rollupListName]
 foreach($rollupListItem in $listName.Items)
 {
  $listOfItems += @($rollupListItem.Title)
 }
 CompareItems
}

function CompareItems
{
 foreach($foundSite in $listOfSites)
 {
  ## Filter out anything that already exists in the Rollup List
  ## We have to use -notcontains/-contains when analyizng arrays
  if($listOfItems -notcontains $foundSite)
  {
   ## Item not found so lets create new item
   foreach($value in $foundSite)
   {
    $rollupListWeb = Get-SPWeb $rollupSite
    $rollupList = $rollupListWeb.Lists[$rollupListName]
    $rollupListItems = $rollupList.Items.Add()
    $rollupListItems["Title"] = $value
    $rollupListItems.Update()
    Write-Host "Creating $value"
   }
  }
  else
  {
   ## Item was found so lets update it
   foreach($value in $foundSite)
   {
    $rollupListWeb = Get-SPWeb $rollupSite
    $rollupList = $rollupListWeb.Lists[$rollupListName]
    $rollupListItems = $rollupList.Items
    
    if($rollupListItems.Title  -notmatch $value)
    {
     $rollupListItem["Title"] = $value
     $rollupListItem.Update()
     Write-Host "Updating $value"
    }
   } 
  }
 }
}
Start-SPAssignment -Global
GetListOfSites
Stop-SPAssignment -Global

Thursday, February 21, 2013

SharePoint, cookies + masterpages

Today I find my self tasked to take care of a requirement on our network to alert users that they are accessing sensitive information and that in order to access our portal we need to make sure the message pops up no matter if they have book marked their sites or have shortcuts to other locations on the portal that they use to get into their site.

Normally I would create a Visual Studio solution for a custom master page, but our portal was migrated from 2007 to 2010 and some site collections had already been using a customized master page that in most cases had been modified using SharePoint Designer and those changes were not going to be changed.

The other challenge I had was I needed a way to find out what sites had a different master page than the custom one that was in use at the top level site,  luckily we only had 3 different master pages in our farm.

Approach to resolving the problem.

Session cookie
In order to get our pop up to display on our intranet we decided to use a cookie that would be called from the master page, this script was uploaded into our main portal site and put in the document library, Site Assets, and we made sure that ad\domain users had read access to the library. Since SharePoint 2010 supports javascript out of the box this should be a quick fix.

Once this was done we can use the same line of code added to all of the custom master pages to reference our script, so if the message ever needed to be updated a user could go to the library and edit the javascript file instead of waiting for a developer and a trip through our change management process just to update some text.

The last requirement was that the pop up should needed to be based on the session for the current user, once the user closed their browser the cookie was destroyed, which means that the next time the user opened their browser and went to our site they would be prompted again to acknowledge that they were accessing sensitive information, this needed to be seamless, meaning that when the users navigated from site collection to site collection they should never see the prompt, until they closed and reopened their browser.

var bannerText = "No physical clone trooper costume was produced for their first onscreen appearance. \n\n As revealed in the audio commentary of Star Wars Episode II: Attack of the Clones, every single clone trooper in the film is a computer generated image. In fact, the only thing present on the set was the actor, whose head was used during scenes requiring a clone's face. In Star Wars Episode III: Revenge of the Sith, the armor is redesigned, but remains computer generated. Within the fictional history of the Star Wars universe, this is the basis of the Imperial Stormtrooper armor and shows a gradual evolution in design toward the armor worn in episodes III-VI, known as "Phase II" armor.\n\n The actual armor never changes, but the helmet progresses.";

function setCookie(name,value,days) {
       if (days) {
          var date = new Date();
          date.setTime(date.getTime()+(days*24*60*60*1000));
          var expires = ""; expires="+date.toGMTString();
       }
       else var expires = "";
       document.cookie = name + "=" + value + expires + "; path=/; domain=.company.com";
    }

function getCookie(name) {
       var nameEQ = name + "=";
       var ca = document.cookie.split(';');
       for(var i=0;i < ca.length;i++) {
          var c = ca[i];
          while (c.charAt(0)==' ') c = c.substring(1,c.length);
          if (c.indexOf(nameEQ) == 0) return c.substring(nameEQ.length,c.length);
       }
       return null;
    }

function CheckAuth() 
{
/* Check to see if the AuthConsent cookie exists and put it into a variable so we can check to see if it found what we were looking for*/
 var userConsents = getCookie('AuthConsent');
/* The cookie was found, lets see if the value of true has been added to the file */
    if (userConsents != 'true') {
/* The cookie file was found but the value of true was not in it, so show the warning banner to the user */
        var haveConsent = confirm(bannerText);
/* The user clicked the OK button so now add the cookie */
        if (haveConsent) {
/* Here we set the cookie name in the first parameter, then the value inside the cookie file which we used the word true for, it could be any unique value, and last we set the number of days we want the cookie to set for, we say 0 as we want the cookie to be destroyed when the user closes their browser. */
            setCookie('AuthConsent', 'true', 0);
        }
        else {
            window.navigate("denied.html");
        }
    }
}
CheckAuth()
Updating the master page file
First make sure you know which master page your site is using, either by using Powershell or going to the portal and going to Site Actions > Site Settings > under Look and Feel > Master page. (You really should use Powershell to find out if any of your sites have a different master page.) Also please note that if you do not see the Master page link highlighted below you will need to go to Site Actions> Manage Site Features and enable SharePoint Publishing, IF YOU GO THROUGH THE UI, otherwise use Powershell :)
Open SharePoint Designer and check out the current master page and then Right click on the master page and Edit in Advanced Mode so we can add our little one liner in between the head tags, normally I find the closing tag and add my script reference just above it.
Once this has been added then we need to save, check in, and approve the master page so all of our users can start using it and getting that wonderful prompt. Once you check it in and then accept the dialog window to go to SharePoint and Approve the page, you should start seeing the prompt as the page loads up. In this instance only people with access to approve and higher should be able to see this change, once you Approve it all users will see the change.

Powershell script
Since the master page was customized and set differently in various sites and site collections, I needed a way to update all the sites in a site collection where they were not using the same master page, for this we will use Powershell to loop through all of our sites and set the master page.

if ((Get-PSSnapin "Microsoft.SharePoint.PowerShell" -ErrorAction SilentlyContinue) -eq $null) 
{
    Add-PSSnapin "Microsoft.SharePoint.PowerShell"
}
CLS
## Set variables
$url = "https://www.company.com/"
$masterpage = "$url/_catalogs/masterpage/Intranet.IT.master"
## Script
Start-SPAssignment -Global
$site = Get-SPWeb $url
if($site)
{
    foreach($web in $webs.Webs)
    {
        $web.custommasterurl = $masterpage
        $web.masterUrl = $masterpage 
        $web.Update()
        $web.dispose()
    }
}
else
{
    write-host "Site not found, please check the URL of the site"
}

Stop-SPAssignment -Global

Tuesday, February 12, 2013

Using Powershell and log files

So much of my initial learning of Powershell involved just banging out scripts and using trial and error to get going. Most of my understanding of what was happening was reading the console, which some nights were hours of going around in circles making a change, run it, make a change, run it.... In hindsight I should have first figured out how to log any data getting output, including errors.
This PowerShell script is my first attempt at getting some details about a set of sub sites in SharePoint and writing them to a text file and then opening the text file to screen so you can see the results.

If anything it has been a great learning experience.

add-pssnapin microsoft.sharepoint.powershell
CLS
## Set Variables
$site = "http://sp2010/dashboards"
$logFilePath = "c:\Temp\Powershell\Logs\sites.txt"
## Delete the file if it exists so the data does not append to the file
$deleteLogFile = Remove-Item -Path $logFilePath -Confirm:$false
## Create a function to handle the logic
function GetListOfSites
{
 ## Check to see if the log file exists
 $checkForLogFile = Test-Path $logFilePath
 if($checkForLogFile -ne $true)
 {
  $webs = Get-SPWeb $site
  ## Make sure the site we specified exists
  if($webs)
   {
    foreach($web in $webs.Webs)
    {
     ## Set the values to variables so we can format the output
     $webName = $web.Name
     $webDescription = $web.Description
     $webUrl = $web.Url
     $webID = $web.ID
     $webTemplate= $web.webtemplate
     $webTemplateID = $web.webtemplateID
     ## Getting fancy
     $siteDetails += 
      "---------SITE DETAILS------------",
      "Site: $webName",
      "Description:$webDescription",
      "Site Url:$webUrl",
      "Site ID:$webID",
      "Site Template:$webTemplate#$webTemplateID"
    }
    ## Output the values into a text file and save it to the file system
    $siteDetails  > $logFilePath 
    Write-Host "Log file has been generated, please wait a moment while the file opens..."
   }
  else
  {
   Write-Host "Site: $web not found, exiting."
  }
  ## Open the log file 
  Invoke-Item $logFilePath
 }
 else
 {
  Write-Host "Log file: $logFilePath not found, exiting."
 }
}
### MAIN
## Using Start-SPAssignment -Global to ensure that we don't leave a bunch of garbage in memory
Start-SPAssignment -Global
GetListOfSites
Stop-SPAssignment -Global

Thursday, January 31, 2013

PowerGUI and SharePoint

I recently upgraded my trusty copy of PowerGUI and then went about my buisness, until I tried to edit a Powershell SharePoint script, which I knew was working. As I tried to execute the script I was seeing an error
 “Microsoft SharePoint is not supported with version 4.0.30319.261 of the Microsoft .Net Runtime.”

Hmmm, closed PowerGUI and opened it back up same error, hmmmm. Head back over to the PowerGUI site and started to look around and found that based on the release notes of PowerGUI 3.2. it seems they added .NET 4.0 support natively. If you want to continue to run you SharePoint 2010 2.0 cmdlets in PowerGUI, you will have to update your config file.
This change works with x64 bit setups, if you want to use a x32 bit then you just need to change the path

Good practices say you should make a backup copy of this file
C:\Program Files (x86)\PowerGUI\ScriptEditor.exe.config

Once that is backed up lets start off by right clicking on Notepad and run it as an Administrator
As the file opens you should see a line of code

supportedRuntime version="v4.0" sku=".NETFramework,Version=v4.0"

just be sure to wrap html comment tags around this line, save it and relaunch PowerGUI and you should be all set.


Access denied after adding SSRS webpart to SharePoint

We have our portal set up so that we can serve external customers as well as our intranet users, we are also using SSRS in SharePoint integrated mode. After adding an SSRS report webpart to our 500 or so dashboard sites, we started getting calls from our external customers saying they were getting access denied when they tried to access the dashboard pages. 3 of us spent several days of combing through error logs, adjusting SharePoint group permissions, restarting the Profile Import Service, restarting IIS, all to no avail.

What happened? Once I had finished creating the report and uploading it to the report library in SharePoint, I had not gone into the SharePoint library where the reports were, mouse over the report to get the sub-menu, and selected  Publish a major version of the report, so while our internal users are having no issues seeing the report our external users were not able to get there, but once that was done users were able to get to their dashboard pages without issues.

What made this issue hard to troubleshoot was the fact that we had several errors in our log files but nothing was saying access denied for this specific webpart, we started taking web parts off the page one at a time in order to see if we could pin point this to a specific web part.

If you are using SSRS and SharePoint be sure to PUBLISH YOUR SSRS REPORTS!!! :)